

How to roof chop a CF Bedford van
In the first part we decided how much to chop our Bedford van, in the second part we marked it out, in the third part we chopped it and are now ready to weld up our chopped Bedford van. So be sure to read everything - Yeah I've said this before, but this is the last time ;)
This page will no doubt be longer than the last, don't let that scare you as the roof chop really is very easy and straight forward, and can easily be done in a weekend - unless you have kids, a wife/girl friend that requires quality time etc, so lock yourself away and go for it.
Before you do start welding double check the outer curves, the diagonal measurements inside and front and be happy that everything is 100% as it wont be as easy to adjust once things are welded up.
All the pillars will need to be sliced or slitted (if that's a word), so for starters just weld the outside on all pillars etc the side door hinge pillar, weld this one on the inside on the edge section that line up only (the middle wont and will may need to be slit).
A lot of the slits will differ from chop to chop depending on the amount chopped, I can't imagine anyone chopping a CF under four inches so they should all require some.
The best method to weld the outside is via spot welding, weld a spot then another and another and another ... this generates less heat which causes less distortion.
In saying this I don't recommend you weld complete sections at a time, although time consuming weld 4-6 spots on each section and go around and around the van until all the sections are fully spotted.
Once the outside has been fully welded we can start on the inside pillars.
For this guide I'll start at the back and work forward but you can start anywhere.
The back pillars
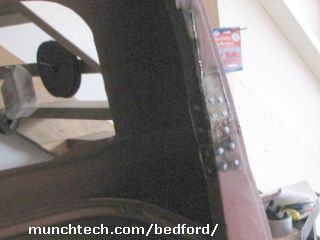
As the back curves should already be tacked, the back pillars are fairly straight forward welding. Be sure to weld the inside panel which is not seen on the outside, this is the panel that holds the hinge bolts etc, forgetting to weld this would cause a squeak or rattle.
Depending how much you have chopped the van the slit on the corner could be as wide as 20mm, if so, instead of trying to fill the gap with weld place a strip of panel steel on the inside of the slit and weld from outside.
 |
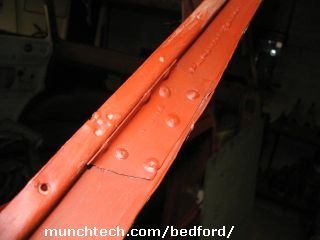
The rear pillars, like the rest needs a gusset. One way to do this is to fold up a U shape that fits inside the pillar about 100-150mm tall (50-75mm either side of the weld line). Make your panel as snug as you can, place the gusset on the outside and mark the height, now drill four or five holes on each side of the weld line. Place the gusset inside the pillar (be sure to grind/trim up any extra bits like weld slag) and securely clamp it in. Once you are happy with the fit plug weld through the holes you drilled (start welding top, go clockwise until you get back to the top and finish in the center). |
The middle pillars (middle-rear & extra pillars on LWB)
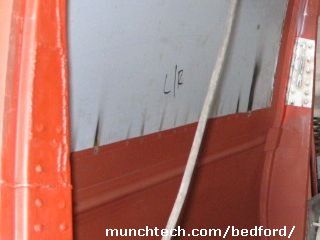
These pillars should be tacked and the outside panels lining up perfectly. Weld up the outside fully, if you have no side windows do this next inside bit first before welding across the window panel.
The inside of these pillars will need to be slit, again depending on the chopped amount this may vary but with a four inch chop the slit needs to go from the join line up to the top gusset (where the original corner joins the pillar), slitting up to this is usually enough. With a straight(ish) edge, gently tweak the inner bit inwards, it wont take much, just be aware it may try to twist, if it does it can be bent back to shape by hand. The inner seams are not perfectly straight of CF's so with the straight edge try get it as straight as you can without effecting the overall angle/curve.
Tack weld the inner lip (this will be the only bit that aligns now), then make up an L panel with panel steel. The L gusset/patch ideally should be the same width as the pillar, 50mm below the join line and up to at least the tip of the slit you created, this is the same on both sides.
| Like the back we will also plug weld this panel, so drill four or five holes (like four of spades or five of spades) below the join line and several up both sides of the slit, these can be 50mm apart and staggered around the pattern, although uniform is nice. Once the patch/gusset is a perfect fit clamp in place and make the other side. Once both are made, securely clamp in and check the outside curve of the van with your original panel steel template, if all is still perfect you can weld in this panel. |
 |
The middle pillars (middle-front)
The left front pillar, (side door hinge pillar) is done slightly different to the others. For this pillar tack weld the corners where the rubbers would go. Now measure the bit you cut out of there (outside bit), if it is 3 1/2 inches (if you chopped it 4 inches) this is what we need, hopefully you cut it out cleanly. measure either side of the join half of what this section is. The plan here is to cut out this width and weld in the bit we first cut out. Once measured and marked out you can cut this section out but be careful as we only want the outer section and there is a strip of steel behind the right hand side which is the main reason we are cutting this bit out. Once the bits have been remove you can weld up the inner strip that was hidden, grind down and coat with rust killer/paint. We will keep this hole open for now as it will be helpful when welding the inner section of this pillar.
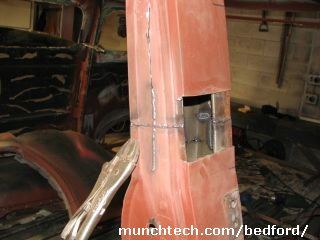 |
The inner on this pillar and most likely the sides of this pillar will need to be slit also, The inner just needs one to align the taper shape, cut and weld this one first before the sides as it gives it something to push against when we slit the sides.The sides are done like the previous pillars but this time the pillars may need to be compressed instead of spread, again, all depending on the chop amount. These sides can be done one at a time as they can be springy. Once the sides are fully welded it is a good idea to weld a gusset on the inner panel, making a panel the width of the inner (through our hole) roughly 40-50 above and below the now welded join, we plug weld this like the previous pillars buy drilling the holes from the inside of the van, deburing, clamping and welded in a circle. |
Once all welding has been finished inside this pillar (the sides and back) it's a good idea to run a wire brush around inside (once its cooled down) and slapping on some PA10 or rust killer. do NOT use rust proof, under seal and anything else flammable as we still need to weld the outside patch on. Once coated trim up the patch panel from the original bit we chopped out, you should have a nice fit, not to tight as metal expands when hot. If you had to drill out the spot welds we can reuse these holes, other wise drill a few holes on each site of this U shaped panel so we can also plug weld this. Welding across top and bottom should be done slowly and carefully as this pillar can warped and as isn't that far away from the body line it can give us a heap of trouble later - slow and steady wins the race.
The drivers side is pretty much like the previous pillars, the side and inner will need to be slit but as it doesn't have an extra side to it the gusset can be a bit of a problem if you don't have side windows. If you don't have side windows at least make a gusset for the main pillar face (the one the door closes onto). Remember we do this for safety, would hate to hear of anyone getting hurt out there in this crazy world filled with manic drivers out to kill you (that's what it's like riding a motorbike around).
If you don't have side windows or want to panel the side windows now is a good as time as any.
The front pillars
These are done similar to the side door pillar except the bit we cut out is the inner.
The outer should be tacked on and the gap in the roof should be welded
| The outer pillar may have to be slit like the other pillars depending on the amount chopped and where the chop was. If the pillar needs to be slit, do it now, cut and weld the outer section only. Now measure the heights of the front pillars that we chopped out (the inner part, one each side), remove the outer bit and discard or we can make one from panel steel. Mark out the height of this on the inner pillar and cut out the marked section. We need to make another gusset for this pillar like the previous pillars, plug welding either side of the welded join. |
 |
 |
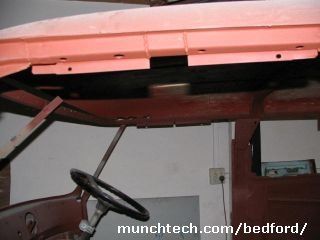
This picture shows the gusset, but note I had taken off the whole inner panel for this which you do not have to do. Once the welding has cooled, clean up with wire brush and coat with some rust killer or similar (nothing flammable), then finally make your patch or use the original bit and weld in, it may need to be split in two as the inner pillar, like the outer tapers. |
Once all the pillars have been welded and the roof sections filled (side windows welded if needed) it's time to grind it all up, Be careful as the angle grinder can create more heat than the welder, a large disc sander can sometimes be best but watch out for that kick back if it grabs, I have a four inch scar across my thigh to prove it happens and overalls and jeans don't do diddly to stop the disc. Once ground up, coat with PA10 or etc primer or similar unless you have dry storage as the doors can take a bit of time, now the doors.
The side & rear doors
The back doors should be cut off at same height as the van was cut or lower. Note the pattern we made earlier is for the sides, the back is a slightly different angle.
The side door is done similar to the back doors.
Chop the doors and tack the outer skin, with a clamp on the inner frame try the door for fit (without door rubbers), once happy with the door gaps, slit the inner frames, tack weld, clamp and check the fit again, if 100% happy with fit fully weld the joins, grind up, fit rubber and check fit again.
The front doors
The front doors are a bit trickier as we need to cut and join the glass channel. It is done similar to the side door hinge pillar and front pillars.
This door should not of been chopped off at this point, if it is you could be in trouble, so if you chopped it off already I want 1000 lines "I will not jump the gun" on my desk by Monday ;)
Mark out the amount you chopped the van on the doors at about the same place as you cut the van, remember the front door pillar needs to be measured out horizontally. Mark it out at the same level all the way around.
Once marked out, using a hacksaw cut the top line first on back and front pillar of the door, including the window channel. Now Very carefully, cut the bottom frame section ONLY, do NOT cut the window channel at this time. Cut both bits leaving the window channel exposed. The top middle section will have to be cut but not just yet, we need to weld the back end on first.
If you took the front doors off the van, now is the time to put them back on. Align your body lines and be sure the door opens and closes nicely now, if your latches are worn work on your body lines.
Measure the exposed window channel and mark half way, if it's a 4in chop then it's two inches. Mark this front and back, remembering the front pillar should be marked horizontally. Cut on the lines but do not throw away the channel you cut off, you can use them for the top section. Now take the top section of the door frame and measure half of the chop amount, before you cut this section be sure the first bit of frame you cut out will cover this gap you are creating. If it is carefully cut off the frame leaving the channel exposed, do this on both ends. With a helping hand this next bit can be tricky so read over it and understand what I am saying and work out a way to do it alone or with help.
Cut the middle of the top door frame (middle is just easier but can be anywhere). We need to do the same as we did with the sides, cutting some off to expose the windows channel but only cut the minimum off here as you will have to make up a filler for the outer edge.
With a pair of vise grips clamp the back channels together, the frame will tend to drop forward so you will need to support it. Now gently close the door and align the top corner, once you are happy with the alignment (you may need to trim the channel) you can weld the channel together, ideally with the door closed to check and recheck the door gap hasn't changed. Grab some masking tape or use your helper to hold this section up while you do the same to the front bit, as well as making sure the door gap is nice up the windscreen pillar be sure to check the top is still straight.
The channel cut out of the sides can be trimmed up to fit the gap in the top, ideally a bit of angel iron or similar tack welded across the top of the frame is great for this bit if you are limiting the paint areas needed your eye can work too. Carefully weld in this bit but be very careful to keep the top straight as it will tend to zig zag. The door hasn't got a lot of strength just yet but it should be holding it's own (a bot of old door rubber in place may help), if it is and your happy with the door gaps etc then it's time to weld in the bits. First check there are no welds or penetration welds on the inner channel of any of the three bits, if there is grind them up now. Brush/spray some PA10 or rust killer over the welded areas front and back and then weld in your patches. Welding is best done by spot weld, two spot welds on each section, back, top, front, back, top, front, check door gaps/fit, back, top , front, back, top, front ... It's slow but is necessary as the door will tend to lean inwards. The sides of the front and back frames may need to be slit, all depending on the chopped amount and where on the door it was cut. The window channel should be straight, it can be slightly out as the weather strip will take up a bit but will wear them out faster, spend the time and be sure to get them straight.
The roof
The roof will also need to be patched, we will have to make this up from panel steel. If you can get a donor roof - wrecker might let you cut a bit off, be warned that the front and rear roof have different height flutes (depending where you cut it). Welding the gutters will be splattery as they used a glue to help join the roof and side panels so with a wire wheel on a drill or wire brush tack weld a bit then clean, tack clean ... you will know when you got the worst of it off when you can make a nice spot weld, trying to weld it in one bit will result in blowing holes and the blow back will find all your tender skin - trust me, I learnt the hard way.
Time to grind, sand, bog (bondo), sand, prime etc ready for paint, but before you do paint just make a check in your gutters, if you can see even a hair line crack in the old paint/sealer then you need to reseal the roof. If you cut the roof at the top of the pillars this seam would definitely be cracked and if you don't seal it water will get inside and start rusting everything.
At this point the whole van should be looking something like this:
 |
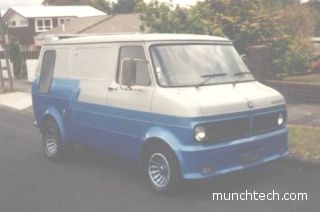 Compare the difference. |
A four inch roof chop is a nice height, you don't really need to lower your seats but you can do if you wish, just remember the pedals will seem at a weird angle if you lower it to much.
I hope you have enjoyed this how to roof chop a CF Bedford van guide, I will be adjusting it to suit any feedback I get on this if needed so please feel free to contact me if you are unsure on anything. Use the contact form on the munchtech contact page
Enjoy your roof chop but don't blame me if you keep hitting your head or get mobbed by females thinking you have a cool van or if your tall friends abuse you.