

How to roof chop a CF Bedford van
In the first part we decided how much to chop our Bedford van, in the second part we marked it out and are now ready to chop our van. So be sure to read everything - Yeah I've said this before :p
Making the cuts
You can use a hacksaw, cut off disc (not on side panels), jig saw (very careful on side panels), panel shears or similar. If you have a friend to help with this section it would make life easier but you can do it yourself without busting ya gut. The trick is several pairs of vice grips or G clamps.
I hear you say what about bracing up the van in case it moves? The Bedford has a semi chassis joined to the floor which is the strength of the van, the sides and roof offer no structural support at all, unlike a car which needs to be braced up.
Cut about 2-3mm away from the masking tape, this way the access can be cleaned up for perfect fit, remember we can take more off, but putting some back isn't always as easy.
Cut each pillar between the marked out lines and then clamp them, a bit of angle iron or wood even clamped to the bits above and below the cut lines (so bits can be removed with roof at same height). Once all the pillars are cut and cleaned up we can remove the clamps/vice grips to lower the roof for a test fit.
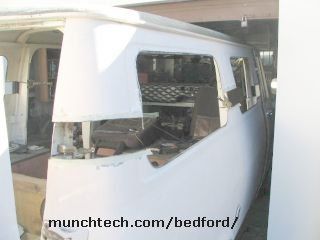 |
On this van I cut the outside bits off and just one cut of the inside pillars, and clamped them. This van I had no helper so I found this method easy for one. Once all the pillars were cut (the big pillars behind the front seats get cut right out), the vise grips were released and the roof slide down. There will be a bit of resistance as the tapering panels are tapering. but you can use that to your advantage, place a block of wood of several clamps to hold the section while you make the last cut. |
With the roof lowered down roughly align the middle four pillars. It is to be expected for the pillars not line up. DO NOT throw the cut bits out yet, we will be using some of them.
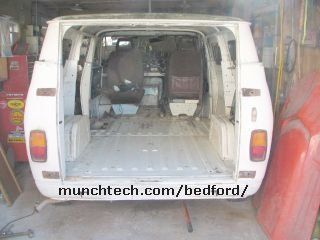
| This picture shows the roof lowered down, notice there are no clamps or anything, the roof will happily sit on the pillars even though they do not line up properly. Just line up the middle pillars, on a jumbo it would be the middle 6 pillars as they are all straight. If by chance the four pillars do not line up (I had one van where the pillar by gas filler was 20mm out) just align the big pillars behind the front seats the best. And you think you have no garage space --> |
 |
 |
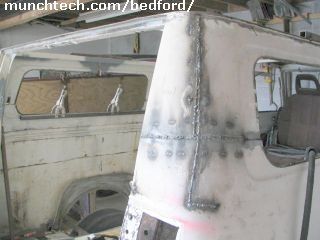
Before we do any welding there is one more important part we need to consider - the front and rear pillar angles. I personally like to keep the original angles of both the front and rear pillars, but in doing so means making cuts across the roof moving the sections out. Even if you don't move the back I wouldn't highly recommend at least keeping the original angle of the front as the front doors are enough work as standard. If you are chopping the van 6+ inches the roof now needs to be split down the center, from end to end - only if you are chopping six plus inches, any less does NOT need this step. <--- That's me cutting off the rear roof section. |
Ok now would be a good time to remind you of the dangers of using a cut off wheel, apart from cutting your limbs off the sparks are hot, maybe not be now but they do burn, don't believe me? I have a photo of my arm, taken not long after the picture above - cutting the rear roof off. Sadly it doesn't show to well at the size I am using for this, it looks like a rash but is hundreds of little burns, so wear a long sleeve shirt, or better yet overalls. Do NOT wear a nylon shirt.
Now is going to be the confusing part as there are so many options - so bare with me.
If the rear pillars where cut on an angle like in the photos and the roof chop is four inches or less the back pillars could be holding the nest set of pillars up a bit.
Method one: If you plan to rake the back pillars you need to make a cut across the top of the pillar under the frame, you only need to cut the pillar not the outside bit and pull the top of the pillar out. Hopefully if you are doing this method you have read all of this first before cutting as it can pay to cut closer to the body line for this method.
Method two: If you are cutting the back section of roof off and moving it back the middle four pillars need to be clamped, they wont line up but still need to be clamped.
Side window recess: If you have side windows or intend to put windows in the rear (on the side) and want the recess to line up you need to get a bit crafty and cut some slits to align the recesses again. This can be time consuming but is worth it. You don't have to do this at this point but do need to figure out if you are doing method one or two.
Now we align the middle pillars.
At this stage we don't need to worry about the front pillars unless they are sitting on the pillars forcing the pillars behind the seats to be slightly raised, if they are the front roof section can be cut off too.
Loosely clamp the four center pillars, taking your ratchet/pull tie down, place the hooks at the top of the bottom cut (so both ends are on the bottom part of the pillar - below the chop line), if you have no helper a pair of vice grips clamped on the pillar is a good way to hold one end while you attach the other. Ideally you should use two tie downs and adjust both pillars at the same time but isn't totally necessary.
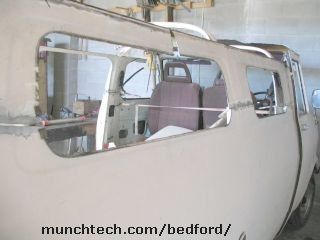 |
Gently tighten the tie down and remove the clamps (holding the pillars), adjust until outside panels appear flush, DO NOT over tighten, carefully tighten and check both sides of van a small bit at a time. Once flush use your template you made earlier and check the curve of the side starting from the body line. Depending on the chop amount the curve may not fit but will give you a good base to work out if the sides are even or not. If one side is different to the other, move the tie down lower on the pillar with most gap on the template, re adjust, tighten, check ... until happy the curve is the same on all four pillars (on the outside). Once happy, securely clamp the pillars from the inside. |
Editors Note This picture above is to show the tie down example, ignore the fact the van has no roof as the gutters were also being removed on this van (not recommended). You will notice the rear roof has been moved back and the windscreen posts have not been cut, yet the front roof section was.
If you made the extra set of marks now is the time to measure these points again and make sure everything is even. If everything measures up and is even add 2 tacks to the outside on all four middle pillar sections. That's two tacks on outside only.
If you have cut the back of the roof off, now is the time to align that. This can be tricky by yourself but can be done, using the inside channel clamp a piece of wood or angle iron to the middle section of roof on both sides, then the rear section of roof can sit on these supports. Align the rear pillars - Note the template will not match the rear curve. Once happy with the rear curve clamp the rear pillars and the other side of the braces you just added on the inner channel. Now to be sure the roof is straight measure the gap on both sides, if the gap is uneven, adjust rear section via the clamps holding the two sections together. Once it all measures up tack weld the rear pillars. Note, only the pillars will line up, the corners will NOT line up at this point as we will need to spread them when we start welding. You can make up some bits to match up the inner gutter at this time if you wish, it is easier to do it in sections so make the inner bits from panel steel (or an old Bedford roof if you have one laying around) and if you are 100% sure all the middle pillars and the back pillars line up these filler bits can be fully welded. Leave the clamped supports in for now though as the roof may tend to bend without them.
We are nearly there but we need a bit more cutting yet before we can weld it all up. Some of which will be covered in the next step.
Going back to the rear window recesses (the middle ones should line up), if you wish to retain this recess now is a good as time as any to sort out how you need to align it. Depending on the chopped amount it may just need a cut parallel to the rear recess and recess section dragged in or out, and/or the bit you cut out welded in instead.
We can check if the van is still square by tape measure, for the pillars behind the front seats remove the seat belts 9if not already removed) and going from the top right to the bottom left (driver shoulder mount to passengers outer floor mount) measure the distance, then the opposite. These measurements should be within 5 millimetres of one another, if not then we need to adjust it. To adjust it take the difference of the two numbers and half it, this is the amount we need to pull the side over. Using a tie down or similar attach to the inside channel of the longest side (the top mount side with the longest measurement) and attach it to the floor or bottom pillar of the opposite side, adjust slightly and remeasure until the difference between the two measurements is 5 mm or less. Do this to both sets of middle pillars. In a jumbo (LWB) we'd do it to all 6 middle pillars. The other pillars don't have seat belt holes so use two identical points, the holes in the inner channel can be good points but only if the inner channel isn't bent - usually they are.
| To align the rear curve we need to slit the panel. In this picture it has been welded but it gives you an idea of where the slits need to be. Roughly find the middle of the curve and cut up to the top, then down to the body line. The top needs to be spread while the bottom needs to be squeezed. Note this van was chopped to high, and because of this it needed an additional cut along the body line (see bottom of lower cut) |
 |
Using clamps etc spread the panel until the curve flows freely, depending on the chopped amount it probably wont take much. Once the panel is in place, place a couple of tack welds on the corner - not to many as we may need to adjust the alignment still.
With three quarters of the vans roof now tacked on, it's now time to do the front. Note the doors are not done until after it's fully welded as welding can change things. If you have decided on moving the front roof forward we do the front the same way we did the back pillars.
If you are not moving the roof forward, but instead raking the front screen you need to cut the pillars at the top inside and the bottom outside and bend to suit. There is no real way to measure this method as the guards are never square, the wipers are offset and the windscreen corners curved. The best method is using the inside seam of the inner top panel (where the sun visor screws to), tape measure on the seam to a fixed point on the floor, the corner or the floor step would do. As long as the measurement is within 5mm all is good.
If the roof was to be moved forward you can measure the squareness the same way and also measure the gap on both sides like we did the back. Once happy is all square you can tack weld the front pillars and make up some filler sections for the inner channel and weld them in - again leave the supports.