

How to roof chop a CF Bedford van
After reading the first part we should of decided on which method we are going to chop the roof - extend the roof or rake the pillars.
For the most part this how-to will cover the extended roof option. So be sure to read everything - Yeah I know I babble on :p
Strip it:
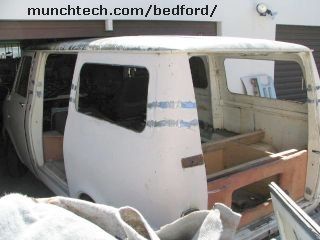
Ok, so now we have decided on the amount - in these examples it's 4 inches, we can strip the van. Remove all the glass (front door glass, windscreen, side windows if any etc) and side door, the front and rear doors can remain if wanted (they can get in the way though) and any interior fittings that may get in the way or that can burn or get marked by grindings and welding.
clean it:
Next we need to clean up the steel and mark out the cut lines. Don't be too eager to start cutting as I know you would be, I was when I did my first chop back when I was a teenager. The ideal place to cut is about 3/4 down the top section. The original side window recess is a good guide, about an inch above the bottom recess.
 |
Cutting to high and the doors wont fit; cutting to low and the body line disappears.
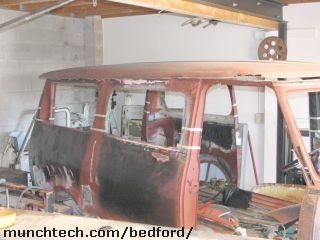
Using a pen roughly mark out 4 inches in this section all the way around the van, it doesn't have to be exact at this point. Taking a disc sander (not a angle grinder) or even an orbital sander, sand off the paint in this area. The inside should also be cleaned (on the inner pillars) about 1-2 inches higher or lower than the outside, we'll come to why later. The lines could be lower than shown in this photo if chopping 4 or more inches. NOTE: This image is for extended roof only. |
Mark it:
Once the paint is removed it's time to start marking out the section you want to remove. Mark out the bottom line around the outside of the van with masking tape first.
Now go along the tape you just put on and with a pen (or thin marker) make arrows pointing up. This is so you know to cut on the inside of this line.
Now cut a piece of panel steel 2 inches (50mm) by the amount you are chopping the van, in this case we'd make it 50x100mm (100mm = 4 inches).
| Take the panel steel, which should be your chop height and with the pen again mark out the top line. Place the panel steel on the top of the masking tape and mark the top, this should be done every 15mm or less. Once you have done the whole outside of the van you can now carefully put some masking tape to the line, remember the bottom of the tape should be on the pen line, once taped up draw a down arrow on the top bit of masking tape. Don't stretch the masking tape, especially on the back pillars as you wont get a true line. And make sure the inwards corners hold the tape as the tape can tend to bubble out. Using your panel steel template, go around the whole van double-checking it is all even. |
 |
If your van has no side windows and you want to keep the original recess, measure the roof chop height till the window recesses, inside the recessed section the gap can be 5-10mm shorter so the panels can overlap giving more strength. Ideally a Tang-a-tong tool should be used to crimp this overlap.
A tama-a-tong is a tool that recesses the panel steel, is either a manual hand held or air tool - also has other names such as flanger.
If you want to keep the original recesses there are a few extra steps to follow. If you plan to put windows in the side, do so after the roof is tacked welded.
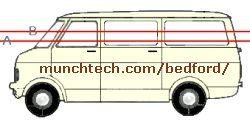 |
A = The first line (lower) B = the second line (upper) |
The inside pillars (the middle two behind driver/passenger) ideally should be cut offset to the outside, the back ones it doesn't matter to much as they are single. All pillars will have gussets but having an offset join makes for a stronger join. A good idea is to put the inside line in the middle of the outside line. So if you are chopping it 4 inches measure 2 inches up from bottom line for your inner bottom line. Using the same method as the outside, measure and mark out the inside chop lines and arrow them.
| Notice the masking tape on the divers side pillar, the inside is marked off lower than the outside lines. | 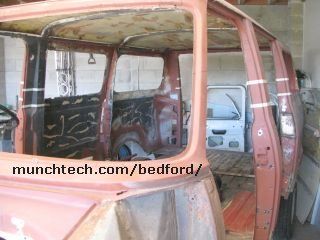 |
Marking out the windscreen pillars is the same as the middle ones - offset. It is also important to point out your lines need to be horizontal, not angled. It's a bit harder to mark out but is a true measurement, if you mark it angled you will be chopping the front more than the rest of the van, so either the roof has to be bent down or the body up, either way makes your front doors and especially door glass a lot of work.
Now go around with a marker pen on the inside edges of the masking tape (in case the tape comes off). It can also be a good idea to mark 2 inches above the top cut line and 2 inches below the bottom line, these marks can be used to confirm we have exactly the desired amount removed at fit time.
One other thing you can do is make a template of the body curve. Using the front drivers door frame place a bit of panel steel in the door jam (where the rubber would close to) and set the bottom of the panel steel to the top body line, now mark the panel steel from the outside of the van - then cut out and trim with file/sander until you can place it on the side of the van (starting at body line) and not see any or very little daylight between it and the side of the van. This will be used to make sure the van sides remains the same on both sides, it may change slightly depending on your chop amount. Mark this panel template and draw an arrow to the bottom with "body line" on it (on both sides) so as you don't get it upside down or cut it up for something else.
Now go around the van one last time and double/triple check the lines are even all the way around. I am speaking from experience when I say making a stupid mistake like cutting on the wrong side of the tape can ruin an easy roof chop. Also the golden rule, measure twice - cut once.
Lets chop it >>